Musings on my adventures around the world and my ties back in Texas as well as some of the the ideas I have to adapt and create to keep those places close to home.

Tuesday, March 26, 2013

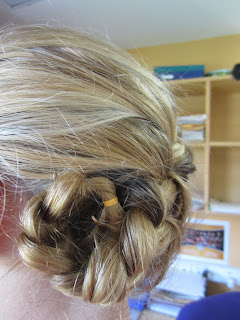
Hair braiding: Meet on the side

I feel as if I found another winner with this one. Another fake crown type braid that hung well ad stayed up through a fairly active day (although by the end of soccer practice it was starting to fall out). In fact I keep wondering if it might be a good hairstyle for flying.

Style 38: Meet on the side


To start with I divided my hair as if I was going to do a headband braid across the front. I put a little more hair towards the front than normal as I wanted my two braids to be fairly even in thickness. Starting over my left ear I braided across the forehead and then curved around to make the braid go behind my ear. I braided the hair out and put a clip at the end to hold it until I finished the other side.


Then I started another braid from just below where I had started the first one. My intention had been to to braid around the bottom hairline of my head, but instead it ended up being more across the back of my head diagonally, which in the end I was pleased with. My aim was to finish adding in hair just about where I had stopped the first braid. I braided it out a little bit just so I wouldn't loose my braid. Then I took both braid in one hand. Pulled out one piece from each braid which seemed to be the closest to each other and made them one strand. The remaining pieces from each braid became their own strands. Then a single braid down to lay in front of my shoulder. To match my very 1950s dress that day I added a small blue ribbon to cover up the rubber band at the end.


Monday, March 25, 2013

Hair braiding: Arabian princess

Several times I wondered what was going through my head this morning? I can't believe I actually went to school like this, but then the day I wore my hair like this it was the day before Spring Break, and anyone can be excused for being a little crazy that day. This all stemmed from wanting to see what would happen if I do a complete French braid from the back nape up to my forehead....

Style 37: Arabian Princess


Oh my! Crazy! (Is my face really that thin?). I started out by flipping my head over and beginning a french braid from the nape of my neck and braiding all of the way to my forehead. I really tried to keep it from getting too bumpy (which seems to be much worse when I braid this way as my hair doesn't normally fall up) and wanted it to be really tight, but I'm never that successful with that on my hair....


As you can see I didn't really manage to do a straight braid, but everyone was so entranced by the front that no one seemed to notice until we tried to take a picture.


When I reached the top, or rather when I had all of my hair added in I tied it off with an almost see through rubber band...tight. Then I took the hair that fell after the rubber band, got it wet to help prevent pieces from sticking out of the smaller braids, and divided it into two (somewhat) equal sections. Each of these I braided and tied off with a small rubber band. I then looped each braid to the side and pinned it in place. I had a fairly large tail that was super visible thanks to the ends of my hair being so much lighter than the top so I decided to try to tuck them under pieces I had pulled into the braid. I ended up pulling them through using my small topsy tail and I they managed to stay tucked away all day. It's a bit of an odd style, perhaps not the best for every day wear, but it definitely brought a smile to a lot of people's faces.


Sunday, March 24, 2013

Hair braiding: Fake rope crown

I'm often looking for ways to replicate a crown without having to do all of that braiding and finger switching, as I find braiding around my head to be one of the most difficult braids to do. I've also been playing with a few more idea that keep some of my hair down, although it strikes me as being the wrong time of year as Delhi is heating up now!

Style 36: Fake rope crown


This is really two ropes that I clipped together in the back. Along the front hair line I did a french rope, where I only added hair into the rope on the forehead side. I added hair in until I got all the way across the forehead and then just completed it out in a rope (it got a bit twisted as I seemed to loose track of which way to twist half way through). I put a clip at the end of that just to hold it for the time being. Then I took a section of hair from just behind where I had started that rope and did a single rope (no adding hair in) as I pulled towards the other side around the back. I attached the two ropes to each other off center in the back to give it more of a crown/circular look.


Saturday, March 23, 2013

Hair braiding: Lobster tail

It's funny. I'm pretty sure I tried something like this once before and it turned out so badly I immediately took it back down (which means it was quite bad!). This time it just seemed to flow right through my fingers easily.

Style 35:  Lobster Tail


I started out by brushing all of my hair back. Then beginning over my right ear (sort of) I did a french braid on a diagonal towards my left shoulder. Once all of the hair was up I finished out the braid and then curled it up, making sure to make smaller circle inside as I curled (my hair isn't long enough to get much more than one curl). Then use hairpins to secure it in place. I got a lot of compliments on this one and was quite happy with how it turned out and how well it stayed up.


Friday, March 22, 2013

Hair Braiding: Braid around a ponytail

The hardest part of this braid was getting a good part into my hair while still being able to keep the rest of it in a smooth ponytail! This is just an easy way to dress up a ponytail if you're willing to have it hang slightly off to one side.

Style 34: Braid around a ponytail


Holding your hair in a ponytail run a fine point through to separate the hair you want in a braid from the ponytail. Put a rubber band around your ponytail slightly off to one side. French braid the hair that is down, being careful not to collect hair that is in your ponytail. Braid from over one ear down and around to underneath your ponytail. Then braid out the end. Wrap the braid around your ponytail and attach it underneath. 


Saturday, March 16, 2013

Hair braiding: finish it with a flower

This is another braid I got from Pintrest. It looked simple enough (which was true) although I'm still not convinced it looks like a flower. It did stay up well and just added a bit more detail to a simple braid.

Style 33: Finish it with a flower


Start by collecting the hair on one side that want you to have in a braid. Braid it (no picking up or anything) pulling towards the center of the back of your head. I always braid it all the way out and attach a clip on the end to hold it. do the same thing with the other side. Collect the two braids where you want them to meet and attach them with a small rubber band. Undo the braids that are after the rubber band so that you can combine that hair into a single braid. Loosen it up by pulling on sections of hair. Attach the end with a small rubber band. Twirl the hair around, when you get close to the end tuck it underneath your circle (sorry, flower) and pin it in place. it's hard to see from the angle in the picture but it added a nice flourish to the braids. Plus it stayed in no problem all day.

Friday, March 15, 2013

hair braiding: meet in the middle 2

This is rapidly turning into my travel hairstyle. It stays up well and doesn't seem to bother me when I try to sleep on an airplane. Really anything that can survive a 24+ hour trip has to be pretty good.

Style 32: meet in the middle 2


I start by dividing my hair down the middle part. Then complete a normal french braid on one side trying to angle myself towards the middle. Typically I pick up hair about six times before I'm roughly where I want my braids to meet. Once I've added hair six times I braid what is in my hand out and stick a clip on the end to hold it. I then do the same thing on the other side. Once I have two braids done I pick them up and hold them in one hand where they (come close to) meet. I release the clips and then pull the one strand from each braid (that are the closest to each other where my hand is) to make one new strand. The other two strands on each side also combine together to form new strands. Then it is just a normal french braid with the rest of the hair.

Thursday, March 14, 2013

Hair braiding: a stand out crown

I got so used to looking for new hairstyles that even though I've moved on to a new personal goal I find myself still looking for new ideas I can do with braids. I've found a few more, so thought I'd better keep track of them for future reference.

Style 31: stand our crown


Just like with a normal crown I divided my hair out from the center of my head, and then started somewhere over my right ear, braiding around the front and then completing a circuit. The only difference is that instead of adding hair on both sides of the braid I only added hair from the bottom (i.e. the outer side of my head). When I pull really tight this has the effect of making my braid kind of roll and stand out. At the end I completed the braid and laid it behind the original braid using hair pins to keep it in place. It  might be a bit easier to see from a side view.


Wednesday, March 13, 2013

Hair braiding: a redo

When I was doing my hair challenge I was thoroughly unsatisfied with how the style turned out on day 6, but felt like there was some potential there. I decided it was worth giving it another shot. It ended up being a much better attempt that stayed up all day (this picture was taken after a full day at school). The difference? When I did the final braid on the right side I pulled the hair from the front of both sides but also picked up a small section of hair where I wanted the braid to hang so that it wouldn't fall lower. Worked like a charm!